Thursday, December 10, 2009

30-Minute Projects with Miss M


I have been having a fun time this year coming up with alternative ways to assess student reading for the Language Arts teachers in my school - read here and here.
While some projects may take several class periods, I was asked to provide some ideas for a quick, one-period projects. So, I tried to come up with some quick 30-minute projects/assessments for teachers who cannot always spare much classroom time.


IDEA 1 - Bookr
How To:
Bookr allows you to create a photobook/photostory. What helps to make this project so quick is that all the tools necessary are in one place.
As long as the students come prepared with a short summary, character sketch, description of favorite part, theme analysis, etc., this can easily be completed in 30 minutes.
Creating Accounts
Students do not need accounts to use Bookr.
Steps
1. Students type one sentence or phrase per page.
2. Student find a picture (using the built-in flickr photo search) to support that text.
3. When the students finish their photo books, they should e-mail them to the teacher for assessment.
Example:

or view book here Soldier X
by Don Wulffson by Miss Makatche


IDEA 2 - BLABBERIZE
How To:

As long as the students come prepared with a short summary, character sketch, description of favorite part, theme analysis, etc., this can easily be completed in 30 minutes.
The finished product is fun and quirky. As I were testing Blabberize out in school, some eighth grade students in the library at the time all wanted to give it a try. So, this one is basically kid-tested and approved.
Creating Accounts
I created one account and was able to have more than one computer creating their blabberize at the same time. I recommend having only one account per class that all students log into because this will make grading the final products much easier since they will all be available on the same account.
Steps
1. Students find a picture of an animal/person/statue (basically anything with a mouth)
I would recommend having a folder on the network available with a variety of pictures from which the students can choose. This helps in two ways: It will save time and it will ensure that the students only choose a picture that has a good mouth area to work with the blabberize concept.
2. Students place the mouth movement area on their picture
3. Students record their written piece and publish/save
Example:


IDEA 3 - GOOGLE FORM
How To:
Here is the quickest assessment of the three. While the students are not creating a product, the Google Form will provide the teacher with an easy, compact way to assess students' independent reading.
Creating Accounts
Students do not need to create accounts.
Teacher will have to have (or create) a free account with Google.
Steps
1. Teachers should embed form on website or wiki or blog or provide students with link to form.
2. Students simply fill out the form and hit submit.
Example:

or view form here.

Stopwatch photo used under Creative Commons license from http://www.flickr.com/photos/77436208@N00/2737425814/.

Saturday, November 7, 2009

Character Traits with Wordle

I have been working with one of my eighth grade language arts teachers to create book projects 2.0 style. Since I've been on a Wordle kick lately, I thought I would come up with a book project using Wordle.

I had recently given my mom, a French teacher, the idea of using Wordle to have her students work with adjectives. Her students created word clouds of French adjectives describing themselves using Wordle. So, I thought, why not transfer that idea to characters in a book.

The students chose one character from their book on which to focus. They then filled out the worksheet embedded below to determine the character traits they would include.

Using Wordle Advanced (see previous post), students created their Character Trait word clouds.


Finally, the students will present their Character Trait word clouds to their classmates. They used the worksheet with the reasons/examples demonstrating why the character presents a trait to develop their oral presentation.

Monday, October 12, 2009

Cloudy in the Library

To continue our goal to build a culture of reading at the middle school, I decided to enlist the help of Wordle. I wanted to come up with a way for students to share with their classmates what books they have been reading. Wordle popped into my mind as a way to allow students to create fun "lists" of what they have read - aka "book clouds". Students have been hanging their newly created "book clouds" throughout the library.

TIPS

Creating Lists

Have students create a list in a Word document. This will prevent and solve any problems that arise from students running out of time or having technical difficulties with Wordle.

Create a numerical scale for them to stay within when creating their lists. I had students assign their names as 100. The maximum number they could assign a book title was 60 and the minimum number was 20. This prevented any titles from being too large and competing with their name or from being so small they could not be seen. I recommended that the students use the numbers as a rating system for how they liked the book - the more they liked it, the higher the number.

Encourage them to create a fairly lengthy list. I printed out their circulation logs to help them remember some titles they read. I recommend at least 25 titles.

Example List:
MISS MAKATCHE READS:100
Hunger Games:55
Fablehaven:50
Someone Named Eva:44
Soldier X:23
Sisters of the Sword:38
Jeremy Fink and the Meaning of Life:26


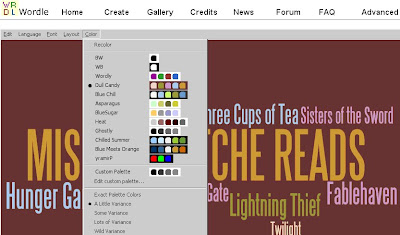
Using Wordle Advanced

Pasting the list into Wordle Advanced allows you to keep book titles together.http://www.wordle.net/advanced

Wordle - Advanced Tools via kwout

Personalizing

Students can continue to hit the RANDOMIZE button until they find a configuration that they like.

The students can tweak the color, font, and layout by using the toolbar at the top of their word cloud.


EXAMPLE
Wordle: Book Cloud

Cloud photo used under Creative Commons license from http://www.flickr.com/photos/35375520@N07/3680331543/.

Sunday, September 27, 2009

Book Review 2.0

I was approached by one of my eighth-grade language arts teachers at the beginning of the year about book reports. She requires her students to read 2 books per quarter and wanted to try some innovative ways to "track" their reading. So, I created a list of ideas for her (which I hope to blog about later), which she will pull from throughout the year.

For her first book project, she decided to go with Glogster book reviews. Glogster is a very teacher/student-friendly site with a separate education portal. So, we set her up with an account and created her student accounts as well . . . very simple!

In order to help her students write a quality book review to incorporate into their glog, I volunteered to do a 20-25 minute mini-lesson on writing book reviews. I did not feel like an expert on writing book reviews, but I found Steve Peha's ideas very helpful.

Here are the 3 resources I created to help the students learn: (all embedded below)
1. Google presentation - unfortunately the speaker notes do not embed along with the google presentation, so some slides at the end may not make complete sense


2. Handout


3. Example


I am really excited about the direction we are headed. Each quarter the students will have critically evaluated their books utilizing a variety of media. Gone are the days of the standard written book report/review!

Tuesday, September 8, 2009

Wordle

Wordle is not a new application, but sometimes it's helpful to remember those little tools in our technology toolbox that don't get used on a regular basis, but are perfect for certain jobs. So, I went right over to Wordle to create a word map of President Obama's speech to students.

I sent this over to my history/social studies teachers to use as an additional resource when discussing the speech with their students.
I think it would be a cool project for students to create their own Wordles, even if just on paper, of the main ideas and messages that they took away from the speech or that inspired them.

Classroom Ideas
  • analyze historic documents (Gettysburg Address, Declaration of Independence, etc.)
  • analyze students' own writing - show words commonly used/overused and check to see if main idea or theme truly comes through
  • create a character description Wordle
  • create an autobiographical Wordle
  • DigiGogy's blog post on the Wonders of Wordle
  • Slideshare - Ways to use Wordle in the classroom


Thursday, August 6, 2009

Cultivating a Culture of Reading

Sometimes trying to cultivate readers in middle school has felt like trying to grow a garden on a sidewalk. The only places where reading was encouraged and promoted was by their language arts teachers and me, the librarian. We provided the cracks in the otherwise barren surface, hoping readers would spring up even under the "harsh" conditions.

So, in an attempt to harvest a greater crop of readers, I formed a reading committee at the end of the school year. I invited teachers of all subject areas to participate. To my pleasant surprise, I received a lot of interested from math teachers to social studies teachers to language arts teachers. We met 2 times over the summer and came up with some fun ideas to create a rich environment for cultivating a love of reading.

Our goal is to create an environment where teachers from all subject areas are promoting the importance and the love of reading. All our initiatives are voluntary (except the SSR) because we want students to choose reading instead of only doing it because it is required.

One Book-One School - We will be encouraging all teachers and students to read Three Cups of Tea

Reader of the Week - Each week a teacher or student will advertise a book over the morning announcements and (hopefully) a blog I would like to set up for this

"I'm reading" Signs - each teacher will have a sign outside their door where they can post the book/magazine/newspaper that they are currently reading

Book Discussion Groups - 3 times a year teachers will choose a book on which to host a discussion group and then students will sign up to participate in the various book discussions

Silent Sustained Reading (SSR) - 15 minutes every Monday morning (it may not be a lot, but it is a start!)

5th Grade Orientation - presentation to parents on the importance of reading and how to encourage their child to read

I would love to hear what do you do to promote reading with students!

Seedling in pavement photo used under Creative Commons license from http://www.flickr.com/photos/50835495@N00/46083890/.

Seedling in soil photo used under Creative Commons license from http://www.flickr.com/photos/86048711@N00/171923662/.

Sunday, August 2, 2009

Test Driving Edmodo

With the emergence of Twitter this past year as a mainstream source for news (Iran and Venezuela), updates from government officials, info from businesses, etc. I want to make sure my students understand microblogging. I do not feel comfortable having my 5th grade students set up individual twitter accounts, so I am planning on using the education friendly Edmodo.

Setting Up Accounts
I have already created my account and created my classes. Each class receives its own access code. As students create accounts on Edmodo (no e-mail address required!) they enter the access code to join their class.

Features
Edmodo provides a calendar and a file management system along with the microblogging. While Edmodo lacks the @ and # that Twitter uses, it provides for them in a slightly different way. Instead of using @ to direct message someone, you can choose a specific person to send it to by choosing from a list. Instead of using a hashtag to create "groupings" on a specific topic, students can tag their posts (tweets). While these are slightly more cumbersome and a little less authentic, I believe students will still learn the fundamentals of microblogging that will easily transfer to twitter or plurk.

http://www.edmodo.com/home/


Edmodo - Home via kwout

Classroom Ideas

  • Resource Sharing - ie: You are doing a project on the Oregon Trail, find a website that you would recommend to others to use for this project. Briefly, in about 15 words, summarize the website/why you would recommend it.
  • Submitting final products - students could message you directly and attach their file
  • Bell-ringer activity/Exit Ticket activity - students respond to a prompt at the beginning of class or the end of class
  • Reminders - remind students about project deadlines, tests, homework
  • Online Discussions - discuss books, current events, music, etc.
I'm sure that I will discover more about Edmodo as I begin to use it with students this year. Look for a future post about additional features I am not yet aware of and more ideas for use in the classroom.

Steering wheel photo used under Creative Commons license from http://www.flickr.com/photos/51035555243@N01/50927878/.


Thursday, July 2, 2009

Annual Report

I always enjoy reading through other librarian's annual reports. It gives me a lot of great ideas for my own library. So, I thought I would add my annual report to the mix. While I would have liked to be able to post the annual report I submitted to my principal and superintendant, it was full of student pictures that I could not share online. So, here is my abbreviated (less pretty) annual report.


To try out something new, I uploaded the report to Yudu to create a an embeddable report. I read about Yudu from Richard Byrne's blog. I have a feeling that Yudu is going to become a new favorite of mine and my students. I forsee this as a great way to include documents on wikis instead of the standard method on wikispaces. Documents can be published as books, pamphlets, newspapers, magazines, etc. Yudu also provides you with the ability to upload photos, audio, as well as visually bookmark websites. I'll definitely be exploring Yudu more this summer!

Sunday, June 28, 2009

Technology Boot Camp

It is hard to believe that another school year is over. However, unlike the start of many summers, I spent the first two weeks at school. Between participating in our school's technology camp and helping interview candidates for the high school librarian position, my summer vacation was "postponed" for a little over a week. I cannot say anything about the interviews. However, it was an interesting process to be a part of and deciding upon the best candidate for the job is not always an easy task. The technology camp was an exciting endeavor initiated by our two wonderful technology coaches. I like to think of it as a "boot camp" for many of our teachers. It gave them an initiation into the world technology and its uses in the classroom. I think many of them caught the technology bug!

This year our high school participated in the Classrooms for the Future grant. With this grant, the high school hired a classrooms for the future (CFF) coach. The success of the high school caused my superintendent to want to bring on a coach for the middle and elementary schools. Much of what a CFF coach does mirrors and/or supports what librarians do. I was lucky enough to work with two excellent technology coaches, who were always willing to work with me and share ideas. So, I was thrilled when they recruited me to help them with two of the days in the technology camp.

I led a day training teachers how to use Interwrite Pads. I absolutely love my Interwrite pad. Interwrite Pads provide all the functionality of a SmartBoard or a Promethean Board, however, they are mobile. I (and my students) can annotate websites, interact with Word documents, control the computer, and much more from anywhere in the room. Here is the wiki I created for the teachers using Interwrite Pads.

The second day, I led the instruction on podcasting. The teachers used Audacity to create a short podcast. We also talked about how podcasting could be used with students and how to display the students' finished products. This led into further discussion about glogster and nings which led to discussion on all things Web 2.0. I showed them my Web2HowTo wiki and encouraged them to sign up for all the technology camp sessions if they had not already.

The general technology comfort level of the teachers who participated was low. However, they were all open to and excited about learning. As the teachers finished the podcasting session, I left them with a short video that I found on YouTube. I think many of them could identify with the video and it gave them a few laughs.


The technology camp created a forum for teachers to be introduced to, play with, and think about technology and its uses in the classroom. It gave me a forum to interact with many of my teachers at once and discuss new projects to implement with their students using the technologies to which they were introduced. I give a lot of credit to our two technology coaches for initiating, planning, and conducting such a successful camp. I would love to create a "Help Desk" night once a month to build upon this initiative. The idea of after-school sessions for teachers was planted by Kim Corfino's insightful post on PD sessions. To implement a "Help Desk" night once a month would be a great way to provide teachers with the continued support and instruction they will need.

Boots photo used under Creative Commons license from http://www.flickr.com/photos/72731134@N00/275276240/

Thursday, May 28, 2009

Glogs, Glogs, Glogs

While this is not the newest tool on the market, I think it is one of the best for educators! Within the past year, glogster has created an education portal for teachers to use with their students. This allows a teacher to create a safe environment for students. Now, students can create their glogs without worrying about running into an inappropriate glog or having an unwanted someone viewing their glogs.

It is so easy to sign-up for an education account. Just visit the edu portion of glogster and set up a class account. If you already have an account, you will want to create a separate account under the edu portal. Glogster will ask you how many student accounts you need and will create the usernames and passwords for you quickly. Within a matter of minutes you will have a separate, private account for each student all integrated within your master account.

An excellent way to display them is to embed the glogs on wikipages. However, there is also a print option and a link option.

There are some great tutorial videos available on creating and embeddinig if you scroll to the bottom of the home page.

Glogs are an amazing tool for your students to use. However, they are also a powerful tool for teachers as well. Use glogs to jazz up your webpage, create a study guide for students, create graphic organizers, host videos and/or audio libraries, create webquests, and much more!

Classroom Ideas:

History
- create timelines (using arrow graphics)
- create historical scrapboks (include pictures,
music, videos, info from the time period)

Language Arts
- create autobiography pages
- book reports
- use as a presentation tool instead of a PowerPoint
- create a poetry glog (find images and music that enhances a poem)

Science
- create an electronic textbook (each student creates a glog around a specific topic from the
chapter)
- create a glog illustrating the steps of the scientific method

Music
- create a glog about a specific composer/artist or genre of music (include sample audio)
- create music library for students around specific composers/artists/genres with some basic
information or links for additional information

Art - host pictures of student artwork

If you have any ideas of your own for using glogster with students, please leave a comment:)


Examples: View a wiki with glogs created by my 5th grade students.


Screen shot of glogster.com/edu taken using kwout.com.

Saturday, May 2, 2009

Geocaching!

The PSLA conference is over and it was back to the old grind today. However, I need another couple of days just to sort through and flesh out all of the ideas that are swimming around in my head right now from all the great sessions.

One of my favorite sessions was by Bridget Belardi on geocaching. I had heard of the term before, and knew vaguely what it was, however, I wanted to learn more about integrating it into the classroom. Geocaching is basically a treasure hunt using GPS technology. A cache can be placed at any location and then seekers must use coordinates and GPS devices to pinpoint the location. The direct connection to geography is obvious, but there are many more ways to use geocaching in the classroom.

The only equipment you need is a GPS device (Garmin was recommended) or an iPhone with Groundspeak's geocaching app. The official geocaching website is great for personal use or to have a generic class acount, but the presenter did not recommend that each student have their own account.

Obviously this is only a project in the making. I plan on talking to my geography teachers tomorrow and seeing if we can write up a proposal to purchase some GPS devices. I would love to be able to implement it next year!

Classroom Ideas:
ideas from Geocaching with Kids
ideas from Science Spot

Additional Resources:
Edcaching wiki
Geocaching (Belardi's webpage)
Educaching

Geocaching photo used under Creative Commons license from http://www.flickr.com/photos/90146879@N00/52849909/.

Thursday, April 30, 2009

Copyright 180

I am attending the always wonderful PSLA Conference at State College, PA.

Yesterday morning I attended a session for librarians and the CFF (Classrooms for the Future) coaches. We began with an enlightening session on how CFF coaches and librarians can work together instead of fighting "turf" wars (see great wiki on collaboration by Hempfield School).

Afterwards we began an eye-opening session on copyright by Renee Hobbs. Renee is founder of the Media Education Lab. Renee provided us with a Code of Best Practices in Fair Use for Media Literacy Education. I feel like the copyright chains have been released for educators and students. We discussed fair use and transformative works in the context of education and how that allows us and our students to use copyrighted materials in many cases where we previously thought we could not. The idea of transformative works is the open window in the stifling environment of copyright guidelines. I feel better equipped to teach my students and teachers how to use copyrighted materials in accordance with the Code of Best Practices instead of always saying, "No, you can't use it."

Watch this video by the Media Education Lab on User Rights! You will do a 180 on the way you deal with copyright (if you haven't already).


Although, I did leave the session wondering, "Where does Creative Commons fall into this picture?" As my students have been creating more digital/media products, I have been pushing Creative Commons this year. So, as if reading my mind, Joyce Valenza began her session on Creative Commons.


Photo used under Creative Commons license from http://www.flickr.com/photos/69141388@N00/97338266/.

Tuesday, April 28, 2009

Rethinking Vocabulary

Merriam-Webster defines "drudgery" as "dull, irksome, uninspiring or menial labor". As students are working on homework in the library, I tend to hear, "Miss M, can you help me/us?" While often it is technology related or project related, many times they need help with their vocabulary homework. I have sat down with many students to help them through their vocabulary workbook . . . talk about uninspiring.

I wonder if a different approach would be more inspiring and interactive to students, and therefore more effective. So, I began to build an alternative (or additional) approach to vocabulary to share with my Language Arts teachers. I wanted the options to be practical, completable in one class period, and introduce and/or reinforce the vocabulary for the week.


1. Wordia - have student pick a word from the list and create a short video wordia-style
  • Have students sit/stand in front of camera with little to no props and explain the word by defining it, telling what it means to them, and giving an example of how to use the word

2. WordAhead - have students create their own narrated definition and example sentence with a visual
  • Instead of having one picture playing the entire explanation (as is done in wordahead) I would have students use a comic generator
  • Try Pixton, Bitstrips, or GoAnimate

3. Weboword - have students create their own stick-figure representations of their word
  • This could be done on good old paper and scanned, in Paint, or try ArtPad or SketchPad

4. Shahi - have students create their own visual dictionary

All of these sites themselves could be used to introduce students to their vocabulary. However, the number of words available on these sites is very limited. I think their true strength lies in providing an example of what students could produce by working with their vocab words.

Tuesday, April 21, 2009

Books Lists Made Fun

I always love finding new ways to promote reading with my students. So, I have slowly been adding to my web2.0 repetoire of book and reading websites.
22books is one of my new favorites. 22books allows you to create book embeddable book lists. The site is very easy to use and plans on offering more features in the near future (ability to share lists, blog lists, etc.)

List Ideas
1. summer reading lists
2. author book lists
3. genre book lists
4. new books in the library
5. books I would like to read
6. books similar to ______________ .
7. books that make use of

Classroom Ideas
1. If students project is to create a wikipage for a school project, have them embed a list on a wiki with books that go along with the topic of the page
2. Have students create lists of books that display a specific literature element
3. Let students create list of books that caught their attention after book talking
4. Let students just have fun with it!

Examples:
In the future they plan on providing users with the opportunity to blog their lists. So, for now, here a direct link to the list I created for students who have read all the books from the Twilight series and are looking for similar reads. If you would like to see an embedded version of the list, you can see it here on my wikispace.

Monday, April 13, 2009

Web2HowTo

At the end of last year, I decided I would try to create a powerful resource for the teachers in my school on various web2.0 applications. I wanted to show them not only what was available, but also provide them with some "how-to's", as well as examples of how to implement in their classroom.


While I'm not exactly sure how many teachers in my school visit this wiki as a resource currently, I hope it will grow into a "go to" place for them.


I recently read Joyce Valenza's blog post on finding the pace of growth, "challenging, and stunning, and staggering." I felt like that post was speaking to me. At times I feel so overwhelmed by the sheer number of amazing web2.0 resources curently available and how many new ones I am constantly discovering. However, as I was reflecting on my web2.0 wiki, I feel that I have found a way to keep a reign on the resources that I want to focus on promoting.


While this wiki may have begun as a resource for the teachers in my school, it has evolved into a resource for me as well. It is a work in progress, and hopefully it always will be a growing "library" of my favorite web2.0 resources to use in the classroom.

Wednesday, March 18, 2009

21st Century Book Talks

Earlier this month our school celebrated Read Across America Day. We invited guest readers to come into the Language Arts classes to read aloud to the students and interact with them about books. I was invited to read to 5 classes. For the 7th and 8th grade classes I read to, I ended with some book talks. However, I decided that I would try something new.

I created a presentation on one of my favorite sites, Sliderocket. I was able to add a mixture of book covers and book trailers. The students loved the book trailers . . . picture students staring in rapt attention with mouths slightly open as a book is being promoted:)
Harper Teen has a wonderful YouTube channel that features book trailers and interviews with authors. So, I converted a few of the video to insert into the presentation. The result is a great advertisement for books that I can use from year to year with different classes.


Book Rainbow photo used under Creative Commons License from http://www.flickr.com/photos/candiedwomanire/1651870/sizes/m/

Thursday, March 5, 2009

Final Product

" "
Our science video podcast project was a true success! The students imported their previously recorded audio and ther creative commons photos into Windows MovieMaker to create their finished product. For the photo credits slide we created powerpoint slides and then saved them as JPEGs which we imported at the end of the photos. As the science teacher viewed each finished product, she has been uploading them to her newly created WRMS Science Rocks ning.

This is the first year that I've been pushing technology with my teachers, since I only discovered the wonderful world of web2.0 in May of last year. Because of this, any technology that we incorporate is new to the students. So, they need to be taught how to use the technology. I'm hoping that as teachers begin to incorporate more technology into their teaching and projects, students will become more independent in using the various technologies.

The students learned so many things working on this project. They learned about alternative energies, about creative commons licensing, how to use audacity, how to use windows moviemaker, and about nings. One student commented, "This is the coolest project I've ever done." What more can you ask for . . . students enjoying their learning experiences?!

Thursday, February 19, 2009

Podcasting - Step 2

SECOND STEP

Last Week
In a post a week ago, I chronicled the first step in the seventh grade scence alternative energy video podcast project.

This Week
To facilitate the students' research, the science teacher created a worksheet packet which is posted on her website. This packet includes requirements, a research guide, and a storyboard template.

Students spent about 4 class periods researching alternative energy sources and finding pictures relating to alternative energy. After they finished filling out their research guide, the students had to write out a script for their podcast (minimum 1 1/2 pages long). Finally, before they were ready to begin, the students created a storyboard of their video podcast.

Today
The science teacher brought her students to the library to record the audio portion of their podcasts using Audacity. After the first class, we realized that we needed to give them a limit of 3 chances at recording. We found that they would record, and being not quite satisfied with it, re-record again, and again, and again. I originally had thought we could get the recording completed in 10-12 minutes, but it ended up taking the entire period. Luckily I had the laptops, microphones, and headphones all set up for the students before they came to the library. When the students arrived, I did a quick tutorial on how to use Audacity and let them begin recording. The students were excited about recording and they had a great time!

Next Week
On Monday, the science classes will be down to the library again. They will be importing their audio and pictures into moviemaker (my solution to creating video podcasts without macs) and uploading their finished product to a ning. More about that on Monday!

Number 2 photo used under Creative Commons License by http://www.flickr.com/photos/gratzer/1414922403/sizes/m/

Sunday, February 15, 2009

Happy Valentine's Day

Happy Valentine's Day!
(a day late, but I like to celebrate the entire weekend)

PicLit from PicLits.com
See the full PicLit at PicLits.com

Valentine's Day always makes me think of poetry and all the wonderful poets who expressed their love so elegantly. Poetry makes me think of PicLits and how I love matching a poem to a picture . . . so here is a PicLit valentine for all my readers:)

Wednesday, February 11, 2009

My First Steps Into Podcasting

Last spring I attended a podcasting session at the PSLA conference and I knew that podcasting would be my big push this year with my teachers.

I began by getting audacity and the LAME encoder downloaded on all the computers/laptops in the library. Next, I taught myself how to use audacity - there are tons of great tutorials out on the web and audacity itself is very simple to use. Then I bought enough headphones and USB microphones for an entire class.

So, now I was ready to pull in the teachers. In addition to talking to teachers, I sent out an electronic newsletter hoping to introduce, educate, and interest teachers in doing podcasts with their students. I was able to interest 5 teachers in developing podcasts projects this year.

I want to highlight the alternative energy video podcast project that a science teacher and I are currently working on. This will be the first of three posts chronicling the process.

FIRST STEP

We introduced the students to the project yesterday. I wanted her students to be aware of copyright and creative commons. So, I created a short presentation (see below) to introduce them to the Creative Commons license and how to give attribution to creators. I also introduced them to compfight - the image search engine they will be using to find their pictures (not blocked by our filter - yay!). Finally, I created a page on my website for students to reference.


After talking to the science teacher today, it sounds like she and the students are excited to be working on this project. The students have one week to create their script and find their pictures before we begin creating our video podcasts.

Next week . . . Second Step!

Photo used under Creative Commons license from http://www.flickr.com/photos/mexicanrejectdafe/3026301012/sizes/m/

Tuesday, January 27, 2009

Fun with Animoto

I've been playing around quite a bit with Animoto the past several weeks. I have not broken down and purchased a full year subscription ($30) or even paid for one full video ($3). I have been sticking to the free 30-second shorts.

I decided that if I can stick to 30 seconds, my students could as well . . . making Animoto possible to use in the classroom (free). Students could sign-up for a free account and then go to town creating 30-second shorts for any class project.

It is beyond easy to use and there is a great music selection available. My only source of frustration is that I am limited to 8 to 9 slides within that 30 seconds, and I never know if they will all make it into my short video until after they have processed and created my 30-second short.

One thing that I really do like about the 30 second time limit is that it forces this to be a quick, one or two period project. So, it is a great technology that teachers can implement without a needing to commit a large amount of class time.

I was bothered by the lack of text that can be placed on the text slides. However, I finally found a way around that. Now, I create my text in Paint and save it as a JPEG which I then import to Animoto as a picture.


Examples:
I heard about an awesome idea by an Arizona math teacher from Lesley Edwards on her blog The Webfooted Booklady. He is asking the world to send his second grade class math question videos. So, I decided to create my own math problem for Room 46 using Animoto.


Here's a little 30-second short that I did as a opening for an in-service presentation I recently conducted on using Interwrite pads.


Classroom Ideas:
videos revolving around a certain vocabulary or spelling word
current event videos - around the world in 30 seconds
teacher created problems or prompts for response by students
create commercials for an advertising unit
book trailers
character studies
artwork portfolios

Do you have any other ideas for using this in the classroom? I would love to hear about them.

Saturday, January 10, 2009

Miss M, I Forget How To . . .

It seems no matter how well I think I explained something and no matter how clear the hand-outs are, I always hear these words a week later. Since I have discovered Jing, I no longer have to reteach the process to individual students. Instead of reexplaining how to do something computer related, I have recorded tutorials to which I now refer my students for a quick review.


With Jing I can create a narrated recording of what I am doing on the computer. I can also take screenshots and then use them to create a worksheet. I can then save the video/screenshot on my computer, embed the video/screenshot, or get a URL to link out to the videos/screenshot. Also, Jing provides free hosting of all videos and screenshots at screencast.

Using Jing is so simple; it is as easy as 1, 2, 3!
1. Select Capture (video or screenshot)
2. Select the portion of the screen you would like to be capture
3. Either begin to record video or begin to mark up screenshot with necessary arrows, text, boxes, etc.

Screentoaster is another site that allows you to record video of what you are doing on the computer. However, you cannot narrate your recordings with audio. I believe, however, that this feature will be coming in the future.

Classroom Ideas:
1. create video tutorials
2. create handouts using screenshots
3. have students create a recordings to demonstrate knowledge of a computer process, application, or software
4. facilitate differentiated instruction and independent work by creating the tutorial videos

Examples:
1. video tutorial
2. sceenshot

Photo by http://www.flickr.com/photos/darling_clementine/2056654756/sizes/o/